How to Recover Space on a USB drive
What happened to the space on my USB drive? If you’re having the same issue as me, and you’re asking what’s wrong with my 16GB drive because it’s only showing half or even a few MB of space available, read on.
There are a number of reasons for lost space such as creating a bootable USB disc with a portable Windows operating system on it or the drive is formatted with an incorrect file system (FAT32) in Windows, or some viruses have been damaged.
Don’t worry, this article will solve all of your troubles. Simply follow the actions or methods outlined above to reclaim your hard disc space.
How to recover space on a USB drive:
There are various methods to get your lost USB space back. Some are more time-consuming than others. For simplicity, you can also use third-party partition software. Let’s get started.
1. Reallocate partitions in USB flash drive: Unallocated partition is the main reason you can’t access your remaining USB space. This is generally created when an ISO file is burned to a USB drive. Another reason is failed formatting.
You can reclaim your lost USB space in one of three ways: partition management software, disc management, or disk-part. We’ll explain all one by one. Let’s get this party started.
Also Read: How to Quickly Free Up Disk Space on Your Windows PC
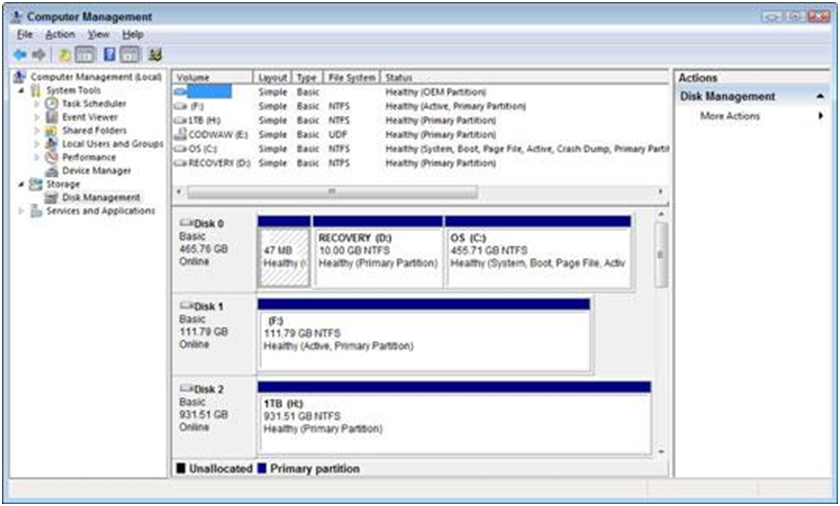
Reallocate using Disk Management:
Step 1: Type diskmgmt.msc into the Search and press Enter.
Step 2: From the list, find your USB Disk, select Unallocated Space and choose “New Simple Volume”.
Step 3: To begin the New Simple Volume prompt, click Next when prompted.
Step 4: At this point, you can specify the volume size. To fill in the remaining space, click Next.
Step 5: You will then be prompted to assign a Drive Letter. Next should be selected.
Step 6: Finally, format the partition and create it. (1) Choose a file system to work with. (2) Make a label for the volume. (3) Press the Next button.
Step 7: To finish creating the New Partition, click Finish.
Reallocating using Disk-part:
Step 1: Open the Start Menu and search for diskpart.
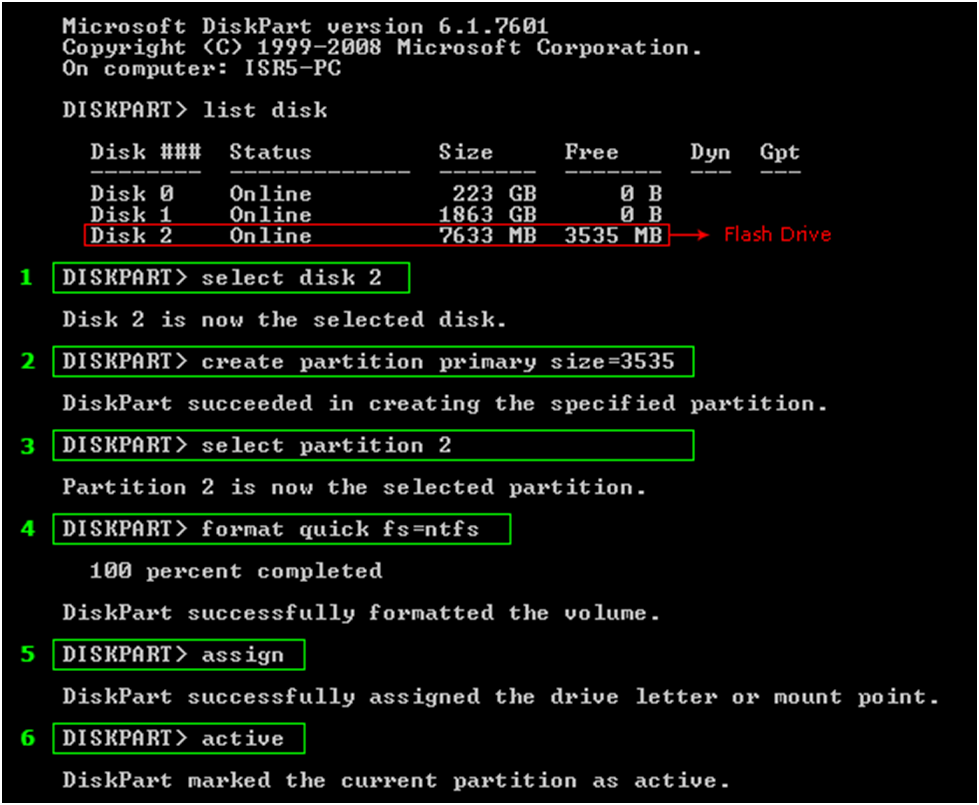
Step 2: Type list disc to see all of your system’s present disc volumes.
Step 3: Connect your USB drive to your computer and type the list disc once more. Take note of the newly added volume.
Step 4: Type chooses disc # (where # is the volume number of your USB device).
Step 5: Type clean to wipe all partitions’ volumes.
Step 6: To create a new partition with unallocated space, type “create partition primary”.
Step 7: To complete, type exit.
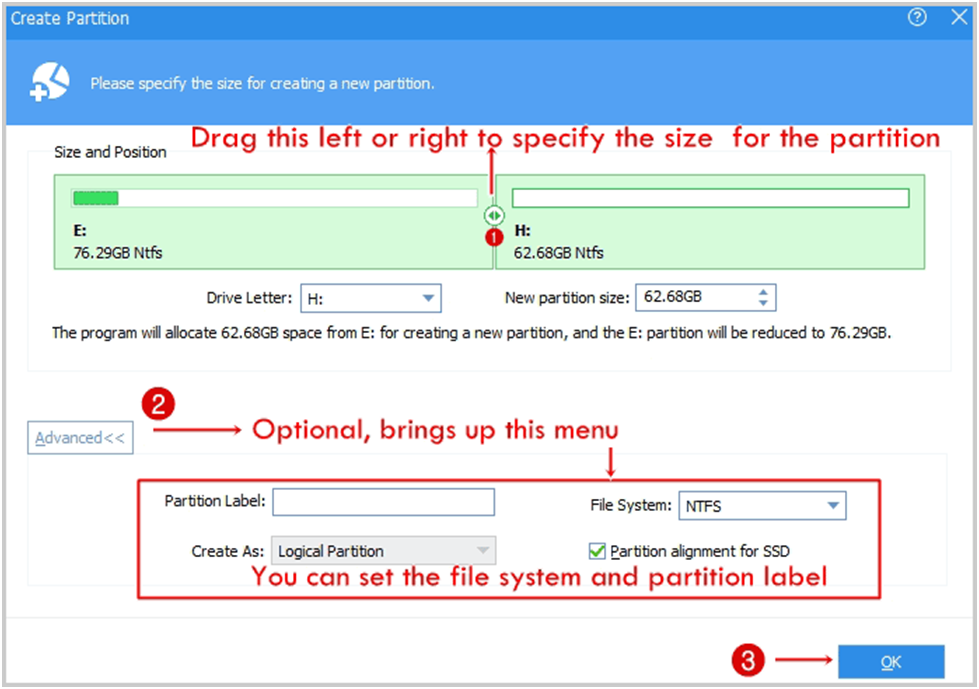
Reallocating using AOMEI Partition Assistant:
The free AOMEI Partition Assistant Standard edition allows you to create, resize, expand, and delete partitions.
Aside from partitioning, you can also construct a bootable USB drive. It’s a simple-to-use program with great capabilities and a clean design.
I would recommend this free disk cloning software because it is free and has a lot of features.
Features:
- The interface is simple to use and comprehend.
- Most common partitioning jobs are supported.
- Uses step-by-step tutorials to complete tasks efficiently.
- Is capable of running before Windows boots up.
- Capable of queueing a large number of changes and applying them in single click.
A step-by-step guide to using the AOMEI partition:
1. Get the software from the official website, install it, and run it.
2. Connect your USB drive, then right-click on the existing partition and choose “Format Partition.” Select FAT32 or NTFS file system in the following pop-up box and then continue.
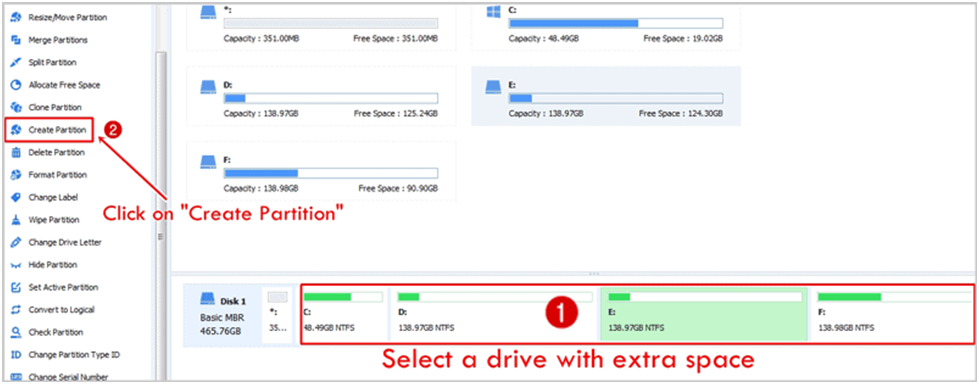
3. Select “Resize partition” from the context menu when you right-click on an existing partition. Drag the slider of the disc on the next screen to include all unallocated space in the partition.
4. You can now see the partition state and revert any operations. If there are no issues, simply click Apply.

After the process is complete, your drive is good to go. If your drive is bigger than 16GB, make sure to use the Quick Partition feature for your drive. If for some reason you delete a certain partition you can get it back.
if you’re unsure why your USB drive appears to be full despite the fact that it appears to be empty. It’s because your USB contains a lot of secret files that you won’t be able to see or erase.
To delete hidden files from your hard disc, follow these steps:
Step 1: Go to the Control Panel and select Appearance and Personalization.
Step 2: Then Next Go to the Options bar.
Step 3: Select Show hidden files and folders from the drop-down menu.
Step 4: A pop-up window should open, allowing you to uncheck the boxes for “Hide extensions for known file types” and “Hide protected operating system files.”
Step 5: The drive should now show hidden files. You can begin eliminating items that you no longer need.
Also Read: What Are The Benefits Of Doing Hard Drive Destruction?
Conclusion:
These are the two most frequent and effective methods for recovering lost space from a USB drive. To prevent a situation like this from occurring in the first place. When creating a bootable USB, try to utilize partition software and always format your disc for hidden files. I hope you got some valuable information from this blog and consider supporting me.